Ankle ligament injuries
Ankle Sprain Rehab: Step-by-Step Return to Sport
Most ankle sprains get better without surgery, but how well they recover depends a lot on the rehab you do. This page sets out a step-by-step programme, with about 12 weeks of structured rehab, to take you from the first painful days back to running and sport. Many people are back to sport within about 3 months, but full recovery, when the ankle feels normal again with no swelling or aching, can take up to 9 months, especially after a severe sprain. It explains how sprains are graded, the exercises for each phase, and the checks that show you are ready to move on.
Quick answers
- How long does an ankle sprain take to heal?
- Mild sprains usually settle in 2–6 weeks and moderate sprains in 6–12 weeks. Severe and inside-of-the-ankle (deltoid) sprains often take 3–6 months before a return to sport, and full recovery can take up to 9 months.
- What should I do in the first few days?
- Follow RICE for the first 1–3 days: rest from painful movements, ice for 10–15 minutes at a time, compression and elevation. Then start walking and gentle exercise as soon as pain allows.
- Do I need an X-ray?
- Usually only if the Ottawa ankle rules suggest a possible fracture, such as tenderness on the back edge or tip of either ankle bone, or being unable to take four steps.
- When can I return to sport?
- When you can hop, cut and sprint without pain or giving way, your hop tests are at least 90% of the other leg, and you have passed the checks at the end of each phase.
- When should I see a foot and ankle surgeon?
- If the ankle keeps giving way, pain or swelling is still present after about 6 weeks, there is pain higher up the leg or on the inside of the ankle, or you are not progressing through the phases.
Who this page is for
This page covers: sprains of the ligaments on the outside of the ankle (the ATFL and CFL) and on the inside of the ankle (the deltoid ligament), from mild (grade 1) to severe (grade 3), including high-grade injuries.
This page does not cover: injuries to the joint surface cartilage and bone (osteochondral injuries), syndesmosis or "high ankle" sprains, fractures, or rehab after ligament surgery. After surgery, please follow your surgeon's own protocol.
This programme is general guidance to use alongside a review by Mr Hester or a physiotherapist. It is not a substitute for being examined. Everyone heals at a different speed, so your own plan may be faster or slower.
Key points
- Recovery takes time. Most people are back to sport within about 3 months, but full recovery can take up to 9 months, and some swelling and aching can last that long.
- Most ankle sprains, including many complete ligament tears, are treated without an operation.[2][20]
- Moving early, with support, usually works better than long rest or a long time in a cast.[2][6]
- Rehab moves through five phases. You move on when you pass the checks for each phase, not just when time has passed.
- Balance training cuts the chance of spraining the ankle again.[7][8] Across trials, exercise-based rehab lowers the risk of a repeat sprain compared with usual care.[23]
- A brace or tape for sport after a sprain lowers the risk of another one.[2][14]
- As a guide, inside-of-the-ankle (deltoid) sprains often take longer to recover. Severe or unstable ones need a consultant's assessment.[9]
The ankle ligaments
Ligaments are strong, slightly stretchy bands that hold bones together. A sprain is an injury to a ligament, from a stretch to a complete tear.
On the outside of the ankle, three ligaments run from the end of the fibula (the bony bump on the outside, called the lateral malleolus) to the talus and the calcaneus (heel bone). The anterior talofibular ligament (ATFL) runs forwards to the talus and is usually the first to be injured when you "roll over" on the outside of your foot. The calcaneofibular ligament (CFL) runs down to the heel bone and is often injured as well in more severe sprains. A third ligament at the back, the posterior talofibular ligament, completes the group.[3]
On the inside of the ankle, the deltoid ligament is a thick, fan-shaped ligament with deep and surface layers. It runs from the medial malleolus (the bump on the inside, at the end of the tibia) to the talus, the heel bone and the navicular. It is injured when the foot is forced outwards (an eversion injury). Injuries to the deltoid ligament on their own are uncommon, around 3–4% of ankle ligament injuries, but it can be injured together with the outside ligaments, the syndesmosis or a fracture.[9]

- Fibula
- Tibia (shin bone)
- Lateral malleolus (the bony bump on the outside of the ankle)
- Talus
- Anterior talofibular ligament (ATFL), usually the first to tear
- Calcaneofibular ligament (CFL), often injured in more severe sprains
- Posterior talofibular ligament (rarely injured)
- Anterior inferior tibiofibular ligament (syndesmosis; injured in a "high ankle" sprain)
- Calcaneus (heel bone)
- Base of the fifth metatarsal (an Ottawa rule check point)
Adapted from Gray's Anatomy of the Human Body, 20th ed. (1918), Fig. 355 (scan: Internet Archive).

- Tibia (shin bone)
- Medial malleolus (the bony bump on the inside of the ankle)
- Talus
- Deltoid ligament, surface layer: a fan running to the navicular and the heel bone
- Deltoid ligament, deep layer (posterior part visible): short, thick fibres to the talus
- Sustentaculum tali (a shelf of the heel bone that supports the talus)
- Navicular (an Ottawa rule check point)
- Spring ligament, supporting the arch
- Calcaneus (heel bone)
- First metatarsal
Adapted from Gray's Anatomy of the Human Body, 20th ed. (1918), Fig. 354 (scan: Internet Archive).
How sprains are graded
Sprains are graded 1 to 3 by how much the ligament is damaged. The grade is easiest to judge a few days after the injury, once the first pain and swelling have eased: examination at 4–5 days is more reliable than on the day of injury. Bruising, tenderness over the ligament and a loose "drawer" test (the clinician gently moves the foot forwards on the leg) suggest a tear.[2]
Outside of the ankle (ATFL and CFL)
| Grade | What is damaged | Typical symptoms | Stability | Typical return to activity |
|---|---|---|---|---|
| Grade 1 (mild) | ATFL stretched, with small-scale damage | Mild pain, tenderness and swelling. You can usually walk. | Stable | Often 2–6 weeks |
| Grade 2 (moderate) | Partial tear of the ATFL, sometimes with the CFL involved | Moderate pain, swelling and bruising. Walking is painful. | Mild to moderate looseness | Often 6–12 weeks |
| Grade 3 (severe) | Complete tear of the ATFL, often with the CFL | Severe swelling and bruising. Putting weight on the foot is difficult at first. | Unstable: the ankle may feel loose | Often 3–6 months, and up to 9 months before the ankle feels normal |
Grades as described in clinical guidelines and reviews.[2][20] Recovery times are typical guidance only. Some swelling and stiffness often take months to settle fully.
Inside of the ankle (deltoid ligament)
There is no agreed grading system for a new (acute) deltoid sprain, so the table below describes the grades in plain terms.[9]
| Grade | What is damaged | Typical symptoms | Stability | Typical return to activity |
|---|---|---|---|---|
| Grade 1 (mild) | Deltoid ligament stretched | Pain and tenderness below the inside ankle bone, mild swelling | Stable | Often 4–8 weeks |
| Grade 2 (moderate) | Partial tear of the deltoid ligament | More swelling and bruising on the inside of the ankle, painful walking | Stable or mildly loose | Often 3–4 months |
| Grade 3 (severe) Consultant-led | Complete tear, often with other injuries (outside ligaments, syndesmosis or a fracture) | Marked swelling and bruising; difficulty taking weight | Unstable; X-rays may show the ankle joint has widened (a widened "mortise") | Often 6–9 months |
Severe or unstable injuries are consultant-led
A grade 3 deltoid injury, or any sprain where X-rays or scans show the ankle joint has widened or the ankle is unstable, needs assessment by a foot and ankle surgeon. Stress X-rays or an MRI may be used, and some of these injuries may be treated in a boot or cast, or with surgery.[9] Recovery often takes 6–9 months, and you should follow the plan your consultant gives you rather than the timings on this page.
The first days
Do I need an X-ray? The Ottawa ankle rules
The Ottawa ankle rules help doctors decide who needs an X-ray to check for a broken bone, and they are very good at ruling out a fracture.[10][11] An X-ray is usually advised if there is pain around the ankle bones or midfoot and any of these:[10]
- tenderness when pressing on the back edge or tip of either ankle bone (the lower 6 cm of the fibula or tibia)
- tenderness over the base of the fifth metatarsal (the bone on the outside edge of the midfoot) or the navicular (the bone on the inside of the midfoot)
- you could not take four steps straight after the injury and still cannot when examined
RICE: what to do in the first few days
For the first 1–3 days, follow RICE, then start using the ankle as soon as pain allows. A short period of protection followed by early movement gives the best recovery.[6][13]
For the first 1–3 days: RICE
- Rest: limit movements that hurt, but avoid long periods of complete rest.
- Ice: 10–15 minutes at a time, wrapped in a cloth, never directly on the skin, and not if you have reduced feeling or poor circulation in the foot.
- Compression: a bandage or support helps limit swelling.
- Elevation: raise the ankle above the level of your heart when you can.
After the first few days
- Start putting weight through the ankle and walking as soon as pain allows.
- Keep your general fitness up with pain-free exercise, such as a static bike or upper-body work.
- Restore movement, strength and balance with the programme below.
- Expect steady progress rather than an instant recovery.
Ice may ease pain, but there is no high-quality evidence that it helps the ligament heal.[12]
Walking with support
Current guidance is to use an external support, such as a brace or tape, and to put weight through the ankle step by step as pain allows. The type of support depends on how bad the sprain is.[2][15] Crutches can help for the first few days if walking is very painful. For severe sprains, a short period in a below-knee cast or a firm brace, for up to about 10 days, may help early recovery.[2][5] Starting gentle exercise in the first week improves ankle function compared with rest alone.[6]
When a "sprain" is something else
Most twisting injuries are ligament sprains, but several other injuries happen in the same way and are easy to mistake for one, sometimes even with a normal X-ray. They need different treatment, so a "sprain" that does not behave like a sprain should be examined again. Clues to look out for:
| Injury | Clues | What usually happens next |
|---|---|---|
| Fracture at the base of the fifth metatarsal | Tenderness on the outer edge of the midfoot | X-ray (an Ottawa rule point) |
| Midfoot (Lisfranc) injury | Swelling over the top of the midfoot, bruising on the sole of the foot, pain standing on tiptoe | Standing (weight-bearing) X-rays, often a CT or MRI scan |
| High ankle (syndesmosis) sprain | Pain above the ankle, worse when the foot is twisted outwards; difficulty hopping | Standing X-rays that include the whole fibula; sometimes MRI |
| Peroneal tendon injury or dislocation | Clicking or snapping behind the outer ankle bone; bruising and pain behind it | Ultrasound or MRI |
| Fracture of the lateral process of the talus | Often a snowboarding injury; tender just below and in front of the outer ankle bone; X-ray often looks normal | CT scan |
| Fracture of the anterior process of the calcaneus | Tender about 2 cm in front of, and lower than, the outer ankle bone | Specific X-ray views or CT |
| Achilles tendon rupture | Often an older person who has tripped on a step; can usually still walk; a gap may be felt above the heel | Calf squeeze (Simmonds) test; urgent review |
| Tibialis anterior tendon rupture | Often over 50, after a stumble; the tendon outline at the front of the ankle is lost; the foot slaps when walking | Examination, then ultrasound or MRI |
| Joint surface (osteochondral) injury | Deep ankle pain, swelling, catching or locking that has not settled after about 6 weeks | MRI |
| Charcot foot | Diabetes with reduced feeling in the feet; a hot, red, swollen foot after a minor injury or none at all | Same-week specialist assessment; keep weight off the foot until seen |
The whole foot should be examined, not just the ankle, and an injury that is not settling should be looked at again rather than treated as a slow sprain.[3]
Your 12-week map
Rehab is split into five phases. The phases overlap: for example, gentle balance work starts while you are still building strength. The timings below are typical, and deltoid (inside) sprains usually take longer. Move on when you pass the "Ready to move on?" checks for each phase, not just because the weeks have passed.
The 12 weeks cover the main rehab programme, not the whole of recovery. Swelling, aching, stiffness and confidence often keep improving for up to 9 months, and severe sprains may need longer in each phase.
| Phase | Outside, grade 1 | Outside, grade 2 | Outside, grade 3 | Inside (deltoid), grades 1–2 |
|---|---|---|---|---|
| 1. Protection & early movement | Days 0–3 | Days 0–7 | Weeks 0–2 | Weeks 0–2 |
| 2. Range of motion & strength | Days 3–14 | Weeks 1–5 | Weeks 1–6 | Weeks 2–7 |
| 3. Balance & proprioception | Weeks 1–3 | Weeks 2–6 | Weeks 3–8 | Weeks 4–9 |
| 4. Hopping & agility | Weeks 2–4 | Weeks 4–8 | Weeks 6–10 | Weeks 7–11 |
| 5. Sport-specific return | Weeks 3–6 | Weeks 6–10 | Weeks 8–12+ | Weeks 9–12+ |
These timings are typical clinical practice, not fixed rules. There is little research on recovery times for deltoid sprains, so their timings are based on expert opinion.[9] Grade 3 deltoid or unstable injuries follow your consultant's plan.
Some swelling can last for up to 12 months, and it often takes months rather than weeks for the ankle to feel normal again.[25][21]
How to use the exercise tables
- Some discomfort during exercise is fine. As a guide, keep pain at 3 out of 10 or less, and it should settle by the next morning.
- If pain or swelling is worse the next day, drop back to the previous level for a few days.
- Keep doing earlier exercises that still challenge you as you add new ones.
- Supervised, structured exercise leads to a faster return to sport than passive treatments alone.[2]
Protection and early movement
Typical timing: days 0–3 (outside, grade 1) up to weeks 0–2 (outside, grade 3, and deltoid).
Goals
- Protect the healing ligament and control swelling
- Walk with support, putting more weight through the foot each day
- Start gentle, pain-free ankle movement
What to avoid
- Outside (lateral) sprain: rolling the foot inwards (inversion), uneven ground, and pointing the toes down and in.
- Inside (deltoid) sprain: forced eversion, that is turning the sole of the foot outwards, and twisting on the foot.
- Long periods of complete rest.
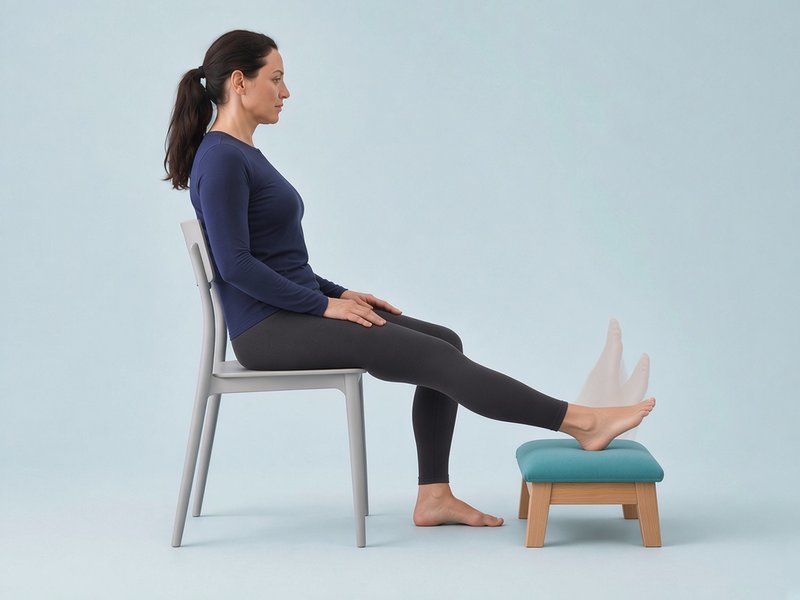
Ankle alphabet
Sit in a chair with your injured leg straight out in front of you and your heel resting on a cushion or footstool, so that your foot is free to move. Keep your knee and hip still: all the movement comes from your ankle. Using your big toe as a pen, slowly trace the capital letters A to Z in the air. Capital letters use the most movement; start with small lower-case letters if the ankle is very sore. Start with letters about the size of your palm and make them bigger as pain allows. Do one or two full alphabets, two or three times a day. Mild discomfort is fine, but keep pain at 3 out of 10 or less, and it should settle by the next morning.
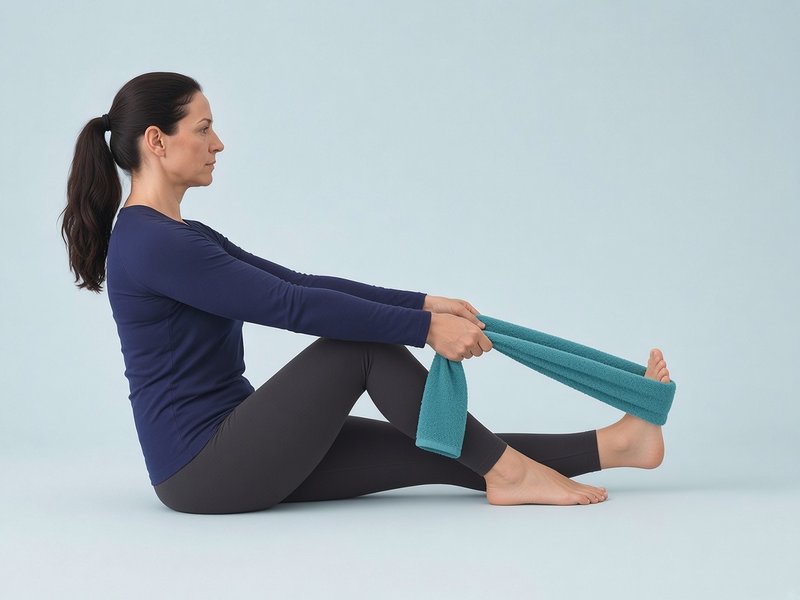
Towel calf stretch
Sit with your leg straight. Loop a towel around the ball of your foot and gently pull your foot towards you until you feel a stretch in the calf. Keep the foot pointing straight up, not turned in or out. Keep the knee straight and do not pull so hard that it pinches at the front of the ankle.
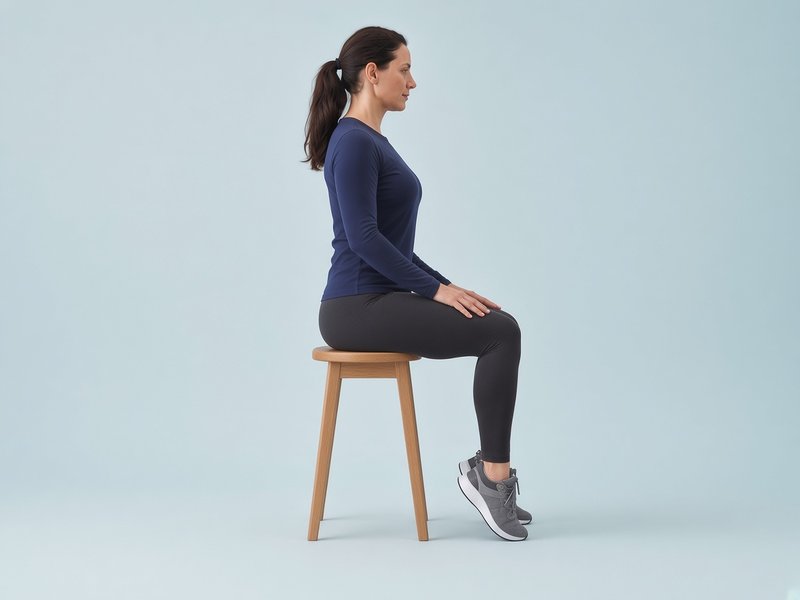
Seated heel and toe raises
Sit with both feet flat on the floor. Lift your heels as high as is comfortable and lower them slowly, then lift the front of your feet while keeping your heels down. This keeps the calf and shin muscles working while the ankle is protected.
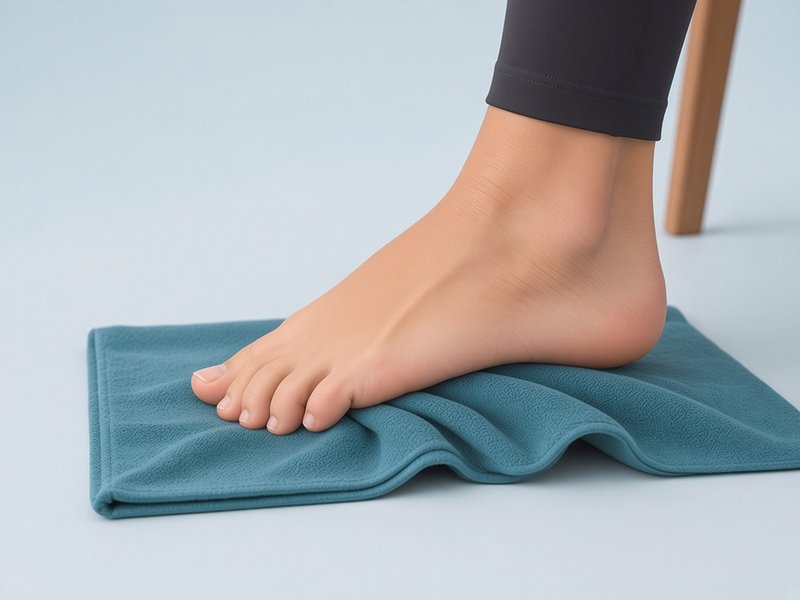
Towel scrunch
Sit with your bare foot flat on a towel. Keeping your heel down, curl your toes to draw the towel towards you, then relax. Later, try "short foot": lift the arch slightly without curling the toes. These work the small muscles inside the foot.
Illustrative images.
Sets, repetitions and frequency in these tables are typical guidance. Your physiotherapist may change them.
| Exercise | Sets × reps | How often | Progress by |
|---|---|---|---|
| Ankle alphabet | 1–2 full alphabets | 2–3 times a day | Making the letters bigger as pain allows |
| Towel calf stretch | 3 × 30-second holds | 2–3 times a day | Moving to a standing wall calf stretch (Phase 2) |
| Gentle isometrics: push the foot against your other foot or a wall, without letting it move, in each comfortable direction | 5 × 5–10-second holds per direction | 2 times a day | Pushing a little harder. For a deltoid sprain, leave pushing outwards until it is pain-free. |
| Walking with support | Short, frequent walks | Daily | Reducing crutches, then walking normally heel to toe |
| Static bike or upper-body exercise | 10–20 minutes, pain-free | Daily if comfortable | Gradually increasing time |
| Seated heel and toe raises | 2 × 15 each | 2–3 times a day | Slower lowering |
| Towel scrunch | 2 × 10 | Daily | Weight on the far end of the towel |
Ready to move on to Phase 2?
- Pain at rest is 2 out of 10 or less
- Swelling is going down, not up
- You can walk short distances without crutches, with a near-normal pattern
- You can stand on the injured leg for about 10 seconds, holding on lightly if needed
Range of motion and strength
Typical timing: from a few days after injury (grade 1) to around weeks 1–7 (grade 3 and deltoid).
Goals
- Get back the full upward bend of the ankle (dorsiflexion)
- Strengthen the muscles that control the ankle from side to side
- Rebuild calf strength and walk normally without a limp
What to avoid
- Deltoid sprain: strong eversion work (pushing the foot outwards) until it is pain-free. Start with small, gentle movements.
- Outside sprain: forcing inversion (turning the foot in) into pain.
- Running, jumping and sport.
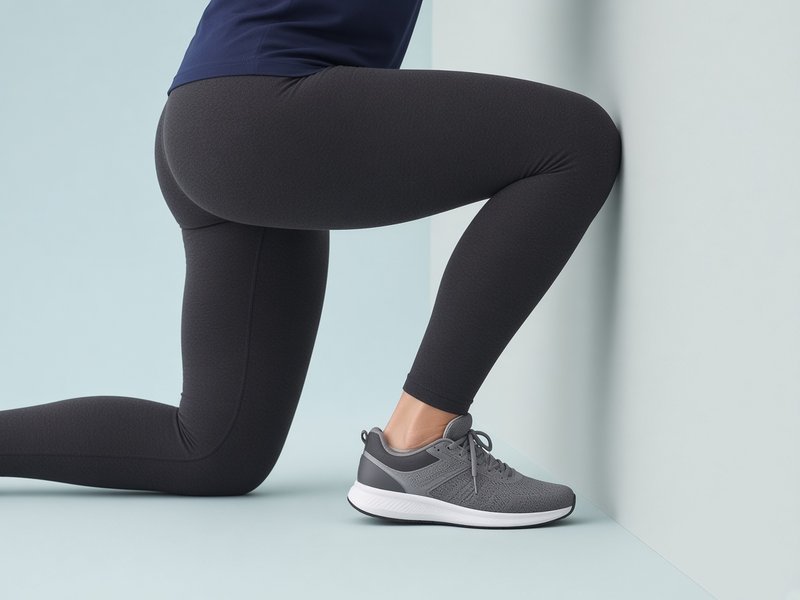
Knee-to-wall
Face a wall with the injured foot in front, toes a few centimetres from the wall. Keeping your heel on the floor, bend your knee forwards to touch the wall. Move the foot back a little at a time. This also measures progress: note the furthest distance from the wall at which your knee can still touch it. Common mistakes: the heel lifting, or the knee falling inwards. Aim the knee over the second toe.
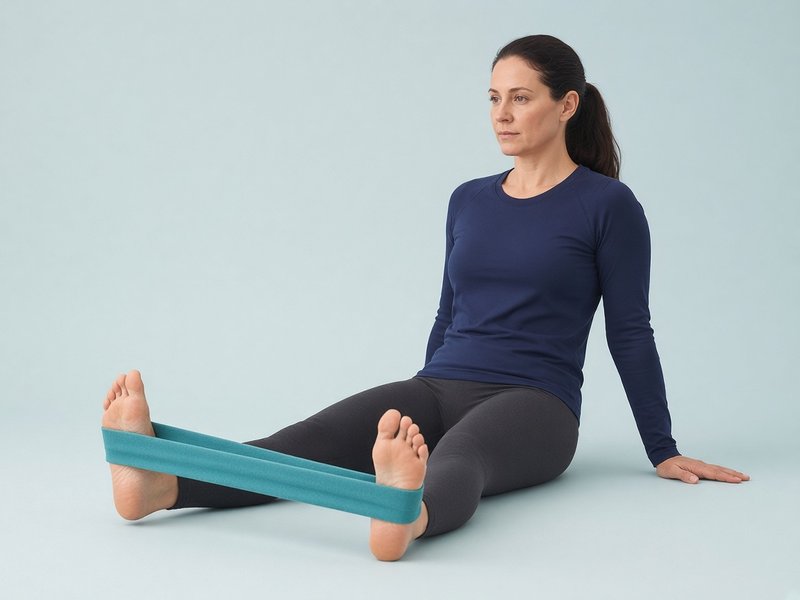
Band eversion (foot outwards)
Sit with your leg straight. Loop a band around the outside of your forefoot and anchor it to the inside, for example around your other foot. Turn your foot outwards against the band, then return slowly. This strengthens the peroneal muscles, which protect the outside of the ankle. Keep the movement at the ankle: the knee and hip should stay still. Take about 2 seconds out and 3 seconds back.
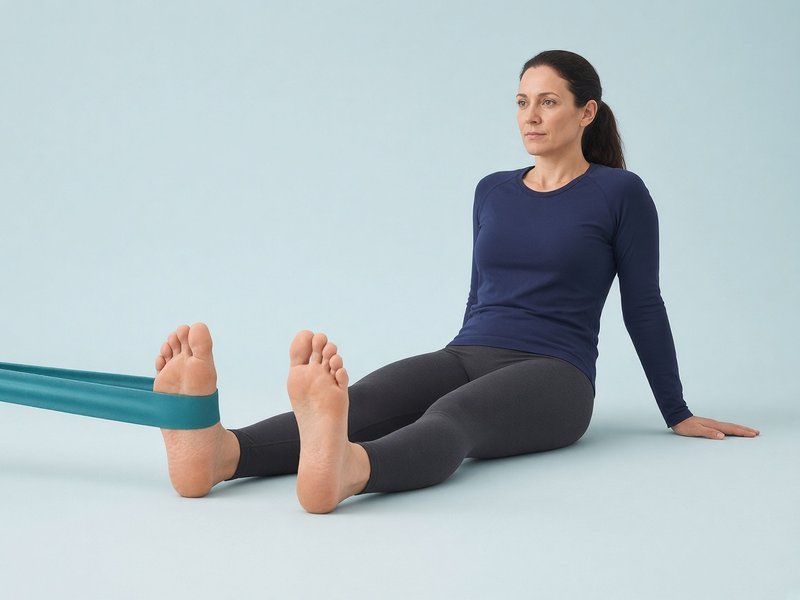
Band inversion (foot inwards)
Loop the band around the inside of your forefoot and anchor it to the outside. Turn your foot inwards against the band, then return slowly. This strengthens tibialis posterior, a muscle that supports the inside of the ankle. After an outside sprain, keep this movement small and pain-free at first.
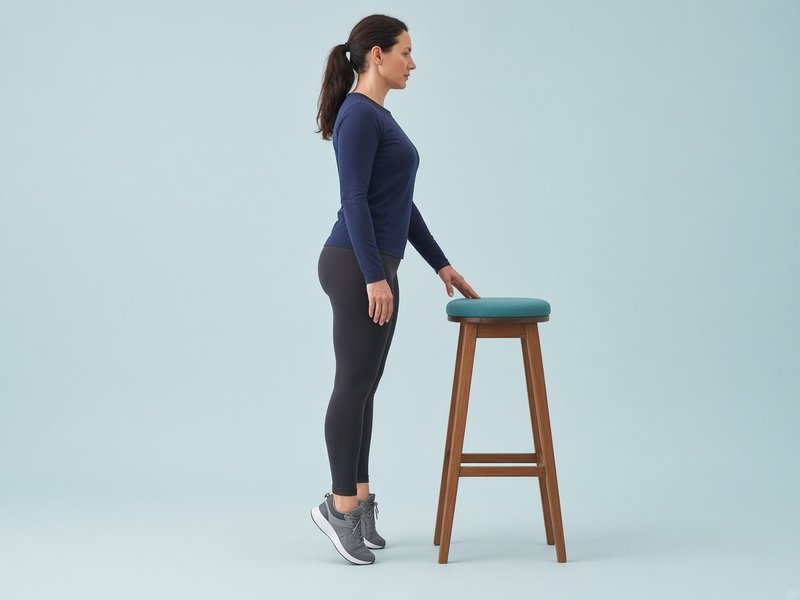
Heel raises
Stand holding a support. Rise up onto the balls of your feet, keeping your weight over the big and second toes, then lower slowly. Start on both feet, then shift more weight onto the injured side, then progress to one foot only. Lower slowly, over about 3 seconds. Later, do them on the edge of a step so the heel can drop below step level. Do not let the ankle roll outwards as you rise.
Step-down (slow lowering)
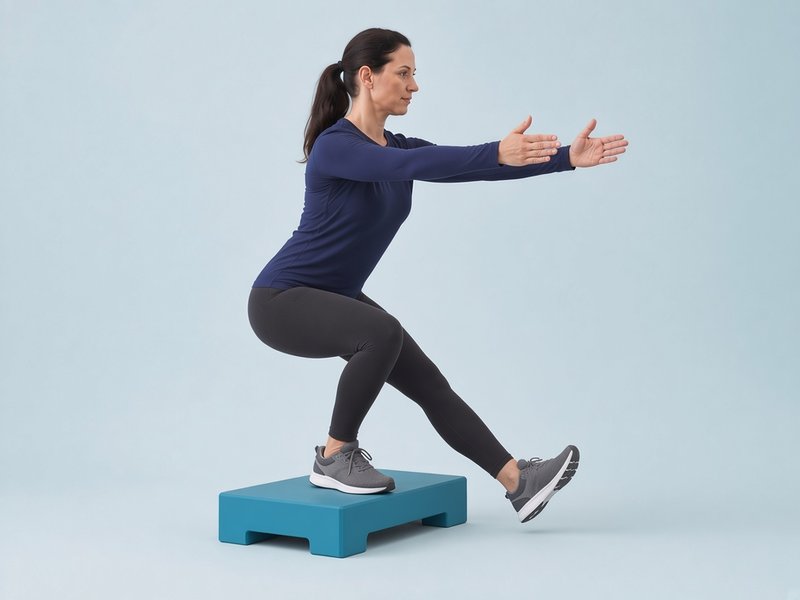
Stand on the injured leg on a low step. Slowly bend the knee to lower the other heel to touch the floor in front, taking about 3 seconds, then straighten up. Keep your knee in line with your second toe and your hips level. This trains control as the muscles lengthen (eccentric control). Start it towards the end of Phase 2 and continue into Phase 3.
Bent-knee calf raise
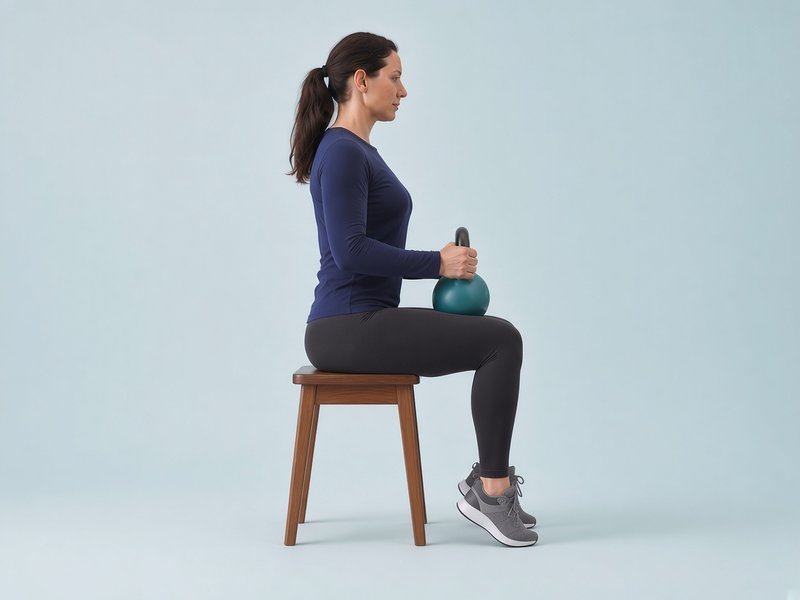
Sit with your knees bent at a right angle and a weight on your thighs. Rise onto the balls of your feet and lower over about 3 seconds. With the knee bent, this targets the deep calf muscle (soleus), which takes a large share of the load in walking and running. Progress to standing with slightly bent knees, then to one leg.
Hip lift and banded side-steps
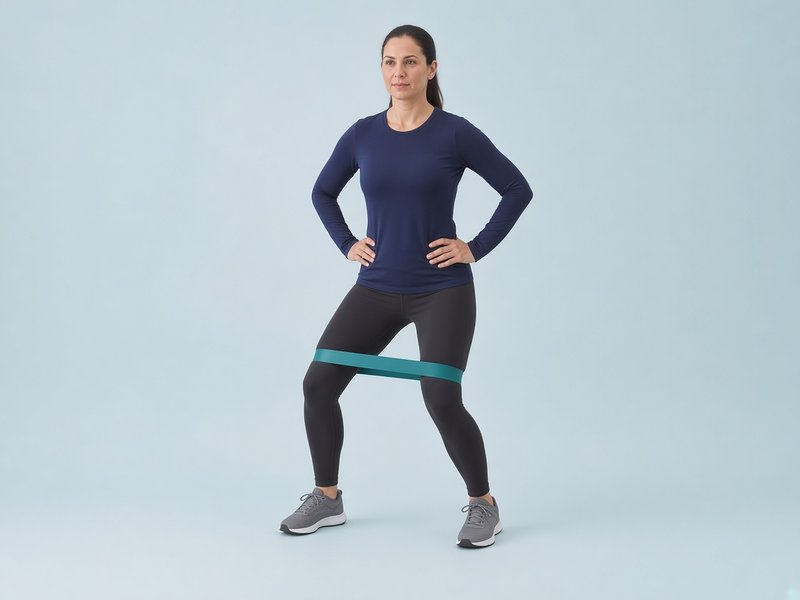
Lie on your good side and lift the top leg up and slightly back, toes pointing forwards, then lower over 3 seconds. When that is easy, put a loop band just above your knees, bend your knees slightly and take small steps sideways, keeping the band taut. Weak hip muscles are common after repeated sprains.

Bridge, then single-leg bridge
Lie on your back, knees bent, feet flat. Push through your heels to lift your hips until your body is straight from shoulders to knees, hold for 2 seconds and lower slowly. Progress to the injured leg only, with the other leg straight.
Squat, then split squat
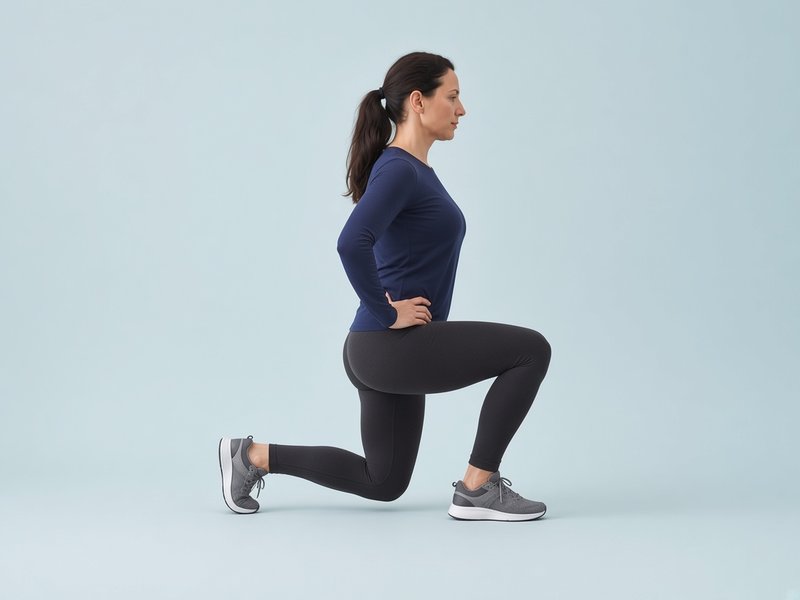
Start with a squat: sit back as if onto a chair, then stand up and rise onto your toes at the top. Progress to a split squat with the injured leg in front, lowering the back knee towards the floor. Keep your front knee over your second toe and your weight spread through the heel, big toe and little toe.

Front and side plank
Hold a front plank on your forearms and toes, then a side plank on one forearm with your body in a straight line from head to heels. Start on your knees if needed. Core control helps you keep your balance over the foot.
Heel and toe walking
Walk 10 metres on your heels, toes lifted, then 10 metres on your toes, heels lifted. Use a wall or worktop for support at first. This strengthens the muscles at the front and back of the lower leg.
Illustrative images.
Sets, repetitions and frequency in these tables are typical guidance. Your physiotherapist may change them.
| Exercise | Sets × reps | How often | Progress by |
|---|---|---|---|
| Knee-to-wall | 2–3 × 10 | Daily | Moving the foot further from the wall |
| Standing wall calf stretch (knee straight, then knee bent) | 3 × 30-second holds each | Daily | A deeper, still comfortable stretch |
| Band eversion | 3 × 10–15 | Daily, then every other day | A stronger band; slower return |
| Band inversion | 3 × 10–15 | Daily, then every other day | A stronger band; slower return |
| Heel raises | 3 × 10–15 | Every other day | Both feet → more weight on the injured side → one foot → holding a weight |
| Step-down | 3 × 8–10, slowly | Every other day | A higher step; slower lowering |
| Static bike | 15–30 minutes | 3–5 times a week | More resistance or time |
| Bent-knee calf raise | 3 × 15 | Every other day | More weight → standing → one leg |
| Hip lift, then banded side-steps | 3 × 12; then 3 × 10 steps each way | Every other day | Stronger band; deeper squat |
| Bridge → single-leg bridge | 3 × 12 → 3 × 8–10 | Every other day | Hold longer; one leg |
| Squat → split squat | 3 × 10–12 | Every other day | Deeper; hold a weight |
| Front and side plank | Build to 3 × 30 seconds | 3 times a week | From knees to feet; longer holds |
| Heel and toe walking | 4 × 10 metres | Daily | Without support |
Ready to move on to Phase 3?
- Pain when walking is 2 out of 10 or less, with no limp
- Little or no swelling at the end of the day
- Knee-to-wall distance within about 2 cm of your other ankle
- 15 single-leg heel raises on the injured side
- Single-leg standing for 30 seconds with your eyes open
Balance and proprioception
Typical timing: from about week 1 (grade 1) or weeks 3–4 (grade 3 and deltoid), lasting several weeks.
Proprioception is your ankle's "position sense": its ability to feel where it is and react quickly. A sprain disturbs this, which is one reason ankles can feel wobbly and sprain again. In one large trial, athletes who did an 8-week home balance programme after their sprain had about a third fewer repeat sprains over the next year.[7]
The trial programme ran for 8 weeks, so aim to finish it.
Goals
- Restore balance and quick reactions on the injured leg
- Control the ankle, knee and hip together on one leg
- Keep building calf and ankle strength
What to avoid
- Hopping and jumping until you pass the Phase 3 checks
- Balance work where the ankle keeps rolling: make it easier instead
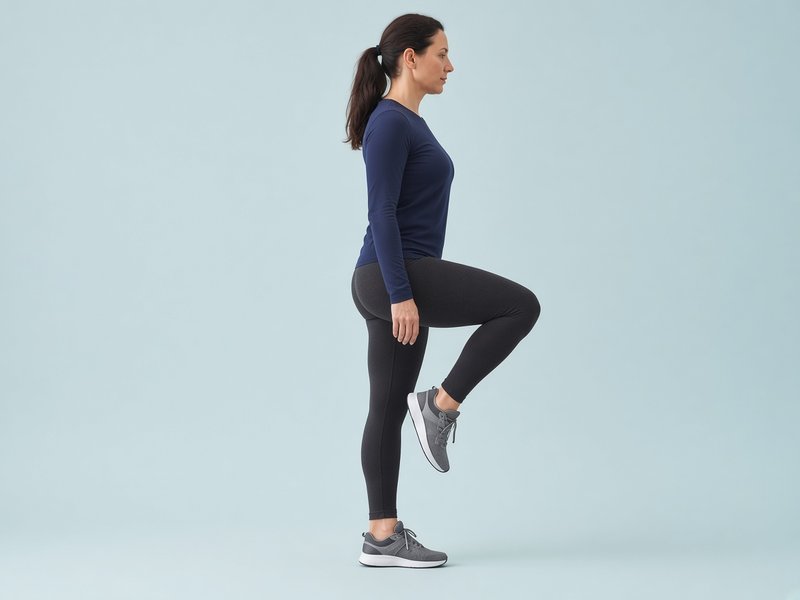
Single-leg balance
Stand on the injured leg near a counter, knee slightly soft, and hold steady. Doing this while brushing your teeth makes it easy to fit in twice a day. Make it harder by closing your eyes, turning your head, or throwing and catching a ball.
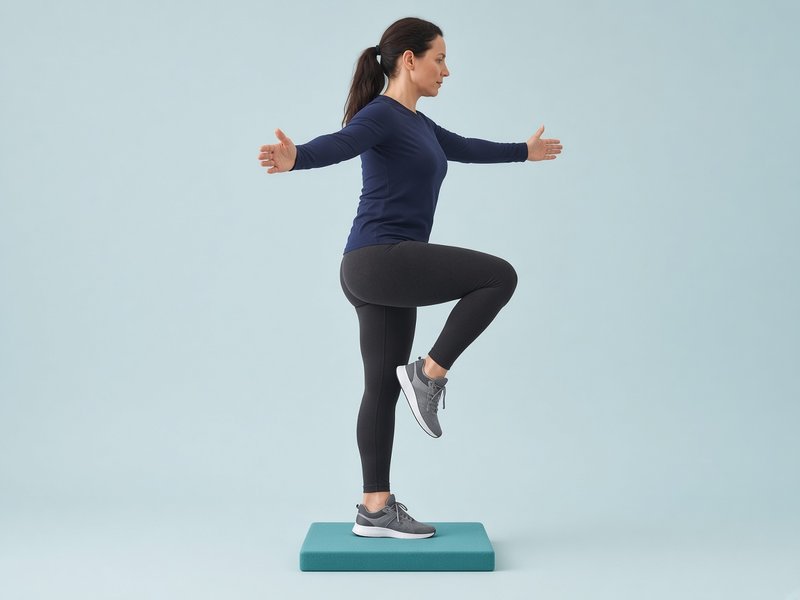
Balance on a soft surface
Once balance on the floor is easy, stand on one leg on a folded towel, cushion or foam pad. Progress to eyes closed or a wobble board as your physiotherapist advises.
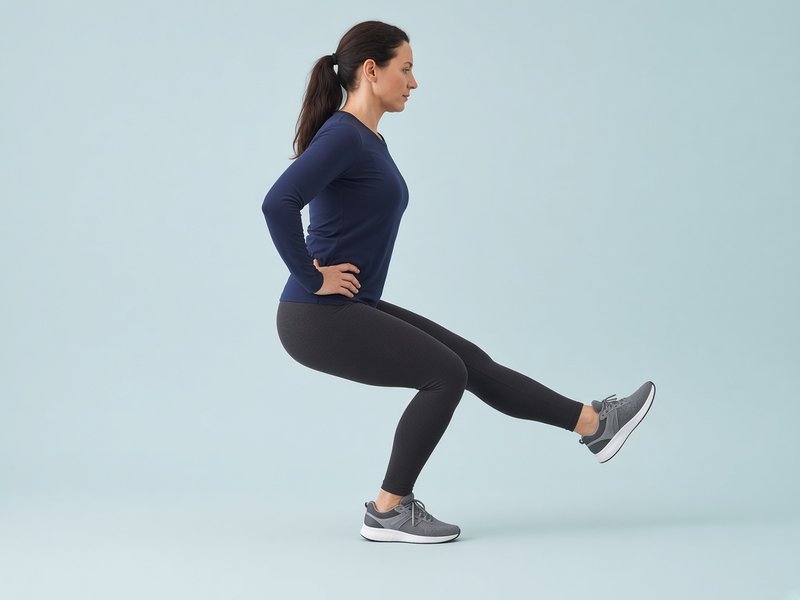
Y-balance reach
Stand on the injured leg at the centre of a "Y" marked on the floor with tape. Reach the other foot as far as you can along each line (forwards, backwards-inwards and backwards-outwards), touch lightly and come back without putting weight down. Compare how far you can reach on each leg.

Balance with a ball or partner
Stand on the injured leg, knee slightly bent. First turn your head slowly side to side, then throw and catch a ball against a wall or with a partner, then have a partner give you gentle pushes in different directions. Real sprains happen when balance is disturbed without warning, and this trains your reactions.
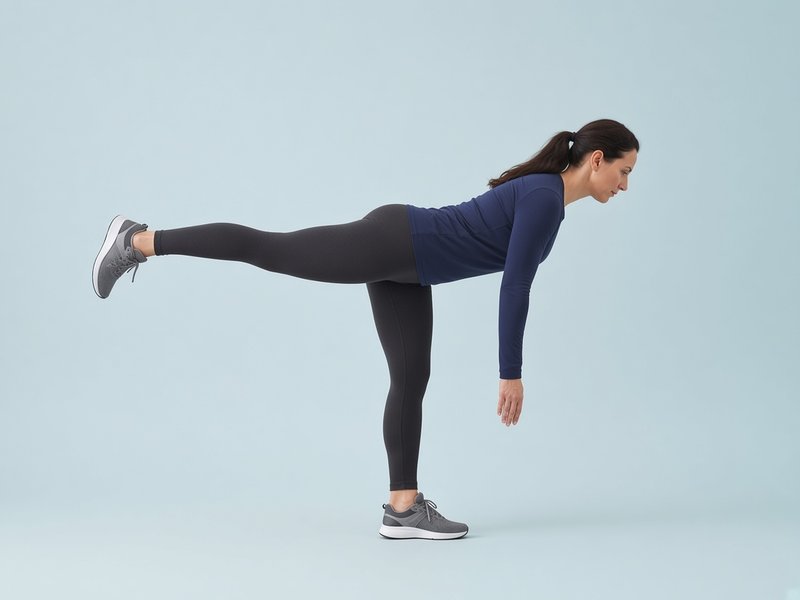
Single-leg reach (Romanian deadlift)
Stand on the injured leg. Hinge forwards at the hip, reaching your hands towards the floor as the other leg goes straight back, keeping your back flat, then return to standing. Move slowly; add a light weight later.
Illustrative images.
Sets, repetitions and frequency in these tables are typical guidance. Your physiotherapist may change them.
| Exercise | Sets × reps | How often | Progress by |
|---|---|---|---|
| Single-leg balance | 3 × 30 seconds | Daily | Eyes closed → head turns → catching a ball |
| Balance on a soft surface | 3 × 30 seconds | Daily | Eyes closed → wobble board |
| Y-balance reach | 3 reaches in each direction, 2 rounds | 3–4 times a week | Reaching further; reaching faster |
| Step-down (continued) | 3 × 10, slowly | 3 times a week | A higher step; holding a weight |
| Single-leg heel raises | 3 × 15–20 | Every other day | Holding a weight; lowering below step level |
| Balance with head turns, ball or partner | 3 × 30 seconds | Daily | Up to 1 minute; harder throws; soft surface |
| Single-leg reach (RDL) | 3 × 8–10, slowly | Every other day | Hold a weight |
| Cardio: bike, pool or cross-trainer | 20–30 minutes | 3 times a week | As comfort allows |
Ready to move on to Phase 4?
- No pain with walking, stairs or brisk walking, and no increase in swelling after exercise
- Single-leg balance for 30 seconds with your eyes closed, similar to your other leg
- Single-leg heel raises close to your other leg. As a guide, healthy adults typically manage about 21–25 or more in a row.[17][18]
- Y-balance forward reach similar on both legs. In a study of basketball players, a difference of more than 4 cm was linked to a higher risk of leg injury. It is a useful check, but it has not been proven as a return-to-sport test.[16]
Hopping, jumping and agility
Typical timing: from about weeks 2–4 (grade 1) or weeks 6–7 (grade 3 and deltoid).
Plyometric exercises (hops and jumps) train the ankle to absorb and release force quickly, as it must in sport. Start running with the return-to-running plan at the beginning of this phase.
Goals
- Land softly and with control on the injured leg
- Build speed, power and quick changes of direction
- Rebuild confidence in the ankle
What to avoid
- Hopping when tired, as control drops off
- Deltoid sprain: hard side-steps and landings that push the foot outwards, until straight-line hops are easy
- Uneven ground until you are confident on the flat

Forward hops
Start with small two-footed jumps on the spot. Then hop on the injured leg, forwards and then backwards. Land softly with a bent knee and hold the landing for a second. Land quietly: a loud, flat-footed landing means the ankle is not yet absorbing the force. Keep the knee over the toes.
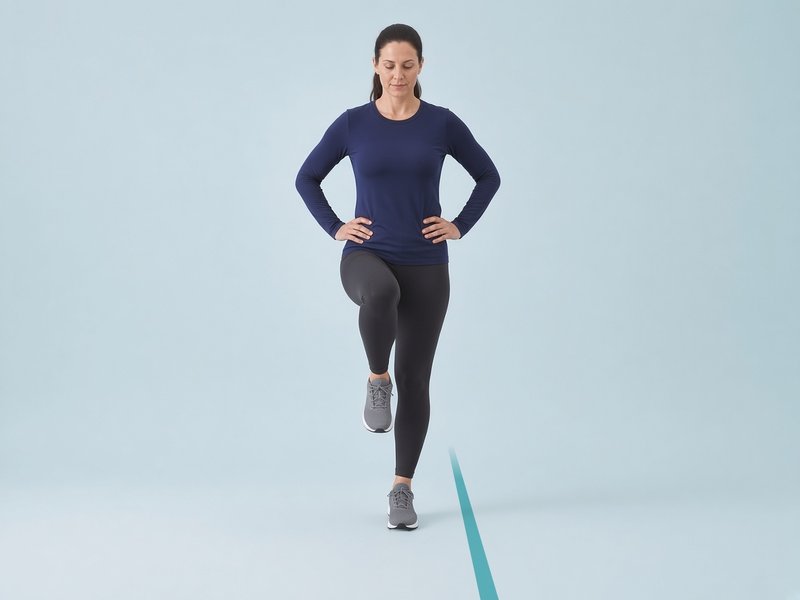
Side-to-side hops
Hop sideways over a line on the floor on the injured leg, keeping your body upright over your foot. Start slowly, pausing at each landing, then build speed. Hopping outwards loads the outside ligaments most, so start with small hops.
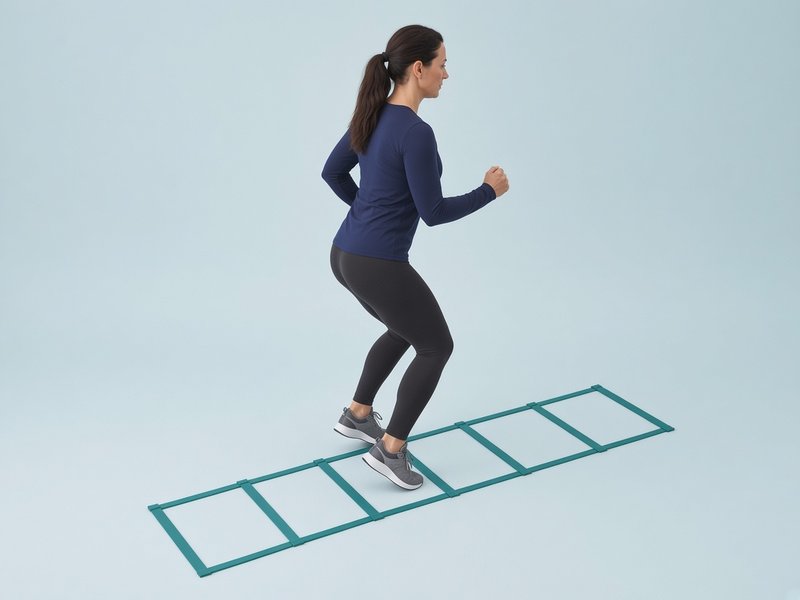
Agility ladder
Use a ladder, or chalk or tape lines, to practise quick feet: one foot in each square, two feet in each square, then side-steps in and out. Start slowly and build speed as your control improves.
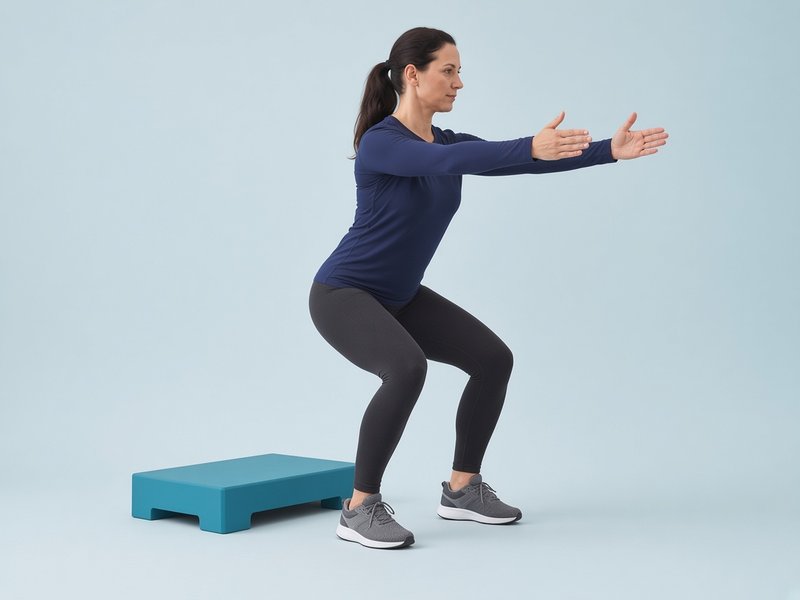
Drop landing (stick the landing)
Step off a low step (15–20 cm) and land softly on both feet, knees bent and in line with your toes, and hold still for 2 seconds. Progress to landing on the injured leg only. Control on landing comes before repeated hopping.

Lateral bounds (skater hops)
Push off one leg and jump sideways about a metre, landing on the other leg, and hold the landing for a second before bounding back. Start small and slow, then build distance and speed and shorten the pause.

Dot drills
Mark five spots on the floor like the five on a dice. Hop between them in set patterns, first on two feet, then on one, as quickly as you can while staying in control.
Illustrative images.
Sets, repetitions and frequency in these tables are typical guidance. Your physiotherapist may change them.
| Exercise | Sets × reps | How often | Progress by |
|---|---|---|---|
| Two-footed jumps, then forward hops | 3 × 10 | 2–3 times a week, not on back-to-back days | Two feet → one foot → hopping further → hopping onto a mark |
| Side-to-side hops | 3 × 20 seconds | 2–3 times a week | Faster; over a low object |
| Agility ladder | 3–4 patterns × 2–3 rounds | 2–3 times a week | More complex patterns; faster |
| Return-to-running plan | See the table below | Every other day | One stage at a time |
| Balance and strength work | As in Phase 3 | 2–3 times a week | Keep going: this helps prevent a repeat sprain |
| Drop landing | 3 × 6 | 2–3 times a week | Higher step; land on one leg |
| Lateral bounds | 3 × 8 each way | 2–3 times a week | Further; faster; shorter pause |
| Dot drills | 3 × 15 seconds | 2–3 times a week | Two feet → one foot; new patterns |
| Cardio: bike, pool or cross-trainer | 20–30 minutes | 3 times a week | As comfort allows |
Ready to move on to Phase 5?
- No pain during hopping and running, and no increase in pain or swelling the day after
- Hop tests (single-leg hop for distance, triple hop and side hop) at least 90% of your other leg
- Jogging continuously for 20–30 minutes without pain
- You feel confident landing and changing direction
How to do the hop tests
Warm up first, wear trainers, and compare the injured leg with the other leg. Take the best of three goes.
- Single hop for distance: stand on one leg, hop forwards as far as you can and land on the same leg, holding the landing for 2 seconds. Measure to the back of the heel.
- Triple hop: three hops in a row on the same leg, as far as you can, then hold the landing.
- Side hop: hop sideways over two lines 30 cm apart; out and back counts as one. Do 10 as quickly as you can and time it.
For the distance hops, divide the injured leg's result by the other leg's and multiply by 100. For the side hop, a lower time is better, so divide the other leg's time by the injured leg's.
Sport-specific return
Typical timing: from about weeks 3–6 (grade 1) to weeks 8–16 or beyond (grade 3 and deltoid).
Goals
- Practise the cutting, turning, jumping and sprinting your sport needs
- Return to full training, then to matches or competition
- Pass the return-to-sport checklist
What to avoid
- Going straight back to matches without full training sessions first
- Stopping your balance exercises once you are back
- Playing without your brace or tape in the first months back (see bracing)

Figure-of-eight running
Place two cones about 10 metres apart and run a figure-of-eight around them. Start with big, slow loops, then make them tighter and faster, running in both directions.
Sport drills
Build in the movements of your sport step by step: cutting and side-stepping, sprinting with sudden stops, jumping and landing, contact, and ball skills. Do them first at lower speed, then at full intensity, then as part of a full training session.
Shuffle, backward run and plant-and-cut
Shuffle sideways for 10 metres without crossing your feet, then run backwards. Then jog forwards, plant your outside foot and change direction. Start at half pace with gentle angles and build to full speed and sharper cuts, off both legs.
Illustrative image.
Sets, repetitions and frequency in these tables are typical guidance. Your physiotherapist may change them.
| Exercise | Sets × reps | How often | Progress by |
|---|---|---|---|
| Figure-of-eight running | 3–5 laps each direction | 2–3 times a week | Tighter loops; faster; on grass |
| Cutting and side-stepping drills | 2–3 sets of 5–6 cuts each side | 2–3 times a week | Sharper angles; higher speed; reacting to a call |
| Sprints with stops | 6–8 × 20–30 metres | 2 times a week | From about 70% effort up to full speed |
| Sport skills, then full training | Part of a session → full session | As your training week allows | Non-contact → contact → match |
| Balance and strength maintenance | 10–15 minutes | 2–3 times a week | Keep going for at least the rest of the season |
| Shuffle, backward run, plant-and-cut | 4 × 10 metres each; 2–3 × 6 cuts each side | 2–3 times a week | Faster; sharper angles; react to a call |
| Cardio: bike, pool or cross-trainer | 20–30 minutes | 3 times a week | As comfort allows |
Ready to return to sport?
Go through the return-to-sport checklist below with your physiotherapist or Mr Hester.
Your progress checks at a glance
A summary of the checks from each phase. Write your results down every week or two so you can see your progress.
| Check | How | Typical target |
|---|---|---|
| Knee-to-wall | Furthest distance from the wall with the knee still touching it | Within about 2 cm of the other side |
| Single-leg balance | Eyes open, then eyes closed | 30 seconds, similar to the other leg |
| Single-leg heel raises | As many as possible, full height, steady pace | Close to the other leg; healthy adults typically manage about 21–25 or more[17][18] |
| Y-balance forward reach | Reach along the line without putting weight on the reaching foot | Within about 4 cm of the other leg[16] |
| Hop tests | Single, triple and side hop (how to do them) | At least 90% of the other leg |
| Running | Return-to-running plan | 20–30 minutes, with no pain the next day |
Bracing and taping
For most sprains, support that lets you move is better than keeping the ankle still. Guidelines prefer a brace or tape plus an exercise programme over a cast for most sprains, usually for 4–6 weeks, with any period of immobilisation kept to 10 days at most.[2] In a large UK trial of severe sprains, a 10-day below-knee cast or a brace gave a faster early recovery than a simple tubular bandage, although results were similar by 9 months.[5] For more severe injuries, a firm brace or a short spell in a cast, for up to 10 days, may be advised.[2][15]
For sport, a brace or tape lowers the risk of another sprain. In the evidence reviewed for one guideline, wearing a brace or tape cut repeat sprains by around 70%.[2] In one trial, athletes who wore a semi-rigid brace for all sport for 12 months had fewer repeat sprains (15%) than those who did a home training programme alone (27%).[14] Both bracing and exercise help prevent long-term ankle instability.[8]
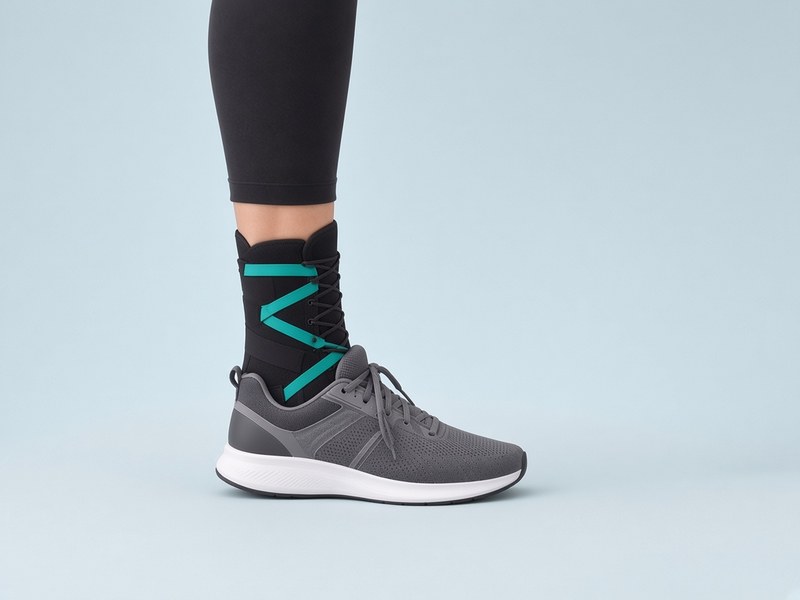
Lace-up or semi-rigid brace
A lace-up brace with straps, or a semi-rigid brace with side supports, fits inside a sports shoe. It limits rolling of the ankle while still letting it bend up and down.
Brace or tape?
Both work, and the choice depends on your preference, your sport and your skin.[2] Tape needs to be applied well each time, ideally by someone trained, and it loosens during exercise. A brace can be put on in seconds and reused.
Illustrative image.
Bracing and taping tips & safety
- Wear the brace or tape for sport and higher-risk activities. Once you are walking normally, you do not need it all day.
- In the trial above, athletes wore the brace for all sport for 12 months.[14] Mr Hester or your physiotherapist will advise how long is right for you.
- A brace or tape does not replace the exercises: keep doing both.
- Remove tape or loosen a brace straight away if the foot becomes pale, blue, cold, numb, tingly or more painful.
- Check your skin when you take tape off. Stop if you get a rash, blisters or broken skin.
- If you have diabetes, reduced feeling in your feet, poor circulation or fragile skin, please get advice before taping or bracing.
Return to running
No running plan has been tested in research specifically for ankle sprains, so the plan below is based on typical clinical practice and expert opinion.
Before you start running, you should be able to
- Walk briskly for 30 minutes without pain or a limp
- Do 20 single-leg heel raises on the injured side
- Balance on the injured leg for 30 seconds
- Hop 10 times on the injured leg without pain
| Stage | Each session | Total time |
|---|---|---|
| Stage 1 | Walk 4 minutes, jog 1 minute. Repeat 5 times. | 25 minutes |
| Stage 2 | Walk 3 minutes, jog 2 minutes. Repeat 5 times. | 25 minutes |
| Stage 3 | Walk 2 minutes, jog 3 minutes. Repeat 5 times. | 25 minutes |
| Stage 4 | Walk 1 minute, jog 4 minutes. Repeat 5 times. | 25 minutes |
| Stage 5 | Jog without walking breaks. | 20–30 minutes |
| Stage 6 | Build up pace and distance, then add bends, slopes, grass and changes of direction. | As comfortable |
- Run every other day, on a flat, even surface to begin with.
- Move up a stage when the current one feels easy, pain stays at 3 out of 10 or less while running, and there is no extra pain or swelling the next morning.
- If you get pain or swelling, drop back a stage for a session or two.
Return-to-sport checklist
An international group of experts agreed five areas to check before returning to sport after an ankle sprain, known as PAASS.[4] There are no proven pass marks for these yet,[19] so go through them with your physiotherapist or Mr Hester.
Pain
Little or no pain during sport, and none over the last 24 hours.
Ankle impairments
Range of movement, strength, endurance and power similar to your other ankle, for example on the knee-to-wall test, heel raises and hops.
Athlete perception
Your ankle feels stable, you feel confident in it, and you feel mentally ready to play.
Sensorimotor control
Good balance and position sense, including moving balance such as the Y-balance reach.
Sport and functional performance
You can hop, jump and change direction, do your sport's drills, and complete a full training session.
Everyday life: driving, work, footwear and travel
Driving
A study of grade 2 and 3 sprains of the right ankle found that braking reaction time was slower at 2 weeks but had returned to normal by 4 weeks.[24] You can drive again when you are out of any boot or brace that gets in the way, you can walk comfortably, and you can do an emergency stop without pain or hesitation. Check with your insurer if you are unsure.
Work
Most people with a desk-based job return within a few days, raising the leg when they can. Jobs with long periods of standing, walking or climbing may need 1–3 weeks after a mild or moderate sprain, and longer after a severe one. Lighter or adjusted duties for a short time can help.
Footwear
Supportive lace-up trainers are the best choice in the early weeks. Avoid high heels, flip-flops and backless shoes until your balance and strength have returned, and take care on uneven ground and on stairs in the dark.
Travel
After a leg injury, long journeys can raise the risk of a blood clot, particularly if you are in a boot or cast or cannot walk normally. On flights or long drives, move your ankles regularly, walk about when you can and drink plenty of water. If you have a severe injury, are immobilised, or have had a clot before, please ask for advice before you travel.
Children and teenagers
In children and teenagers whose bones are still growing, an injury that looks like a sprain can involve the growth plate at the lower end of the fibula. Tenderness over the bone itself, rather than over the ligament, needs a medical assessment.
Preventing a repeat sprain
Having sprained an ankle before raises the chance of spraining it again. Some people still have symptoms a year later, and some go on to have an ankle that keeps giving way (chronic ankle instability).[1][3][21] These steps help:
- Finish the programme. Feeling fine is not the same as being ready. Complete the phases and the checks.
- Keep up balance training. Carry on with your balance exercises two or three times a week, at least for the rest of the season. An 8-week home balance programme reduced repeat sprains in a large trial.[7]
- Brace or tape for sport, especially in sports with jumping, landing and turning.[2][14]
- Warm up properly, including hops and changes of direction, before training and matches. Structured warm-ups such as the FIFA 11+ programme include balance and landing work.
- Wear supportive footwear for your sport, and replace worn-out trainers.
- Get checked if the ankle keeps giving way. Surgery is mainly for ankles that stay unstable despite a full exercise programme.[2]
When to get help
Call 999 or go to A&E straight away if
- a bone is showing through the skin, or the ankle looks badly out of shape
- your foot becomes cold, pale or blue, or you lose feeling in it
- you develop chest pain or breathlessness, or cough up blood (this can be a sign of a blood clot in the lung)
Call NHS 111 or get same-day medical advice if
- you cannot take four steps, or the ankle bones or midfoot are tender to press, as described in the Ottawa rules
- your calf becomes painful, swollen, warm or red (this can be a sign of a blood clot in the leg)
- pain, redness or swelling keeps getting worse, especially with a fever
- numbness, tingling or pain gets worse in a brace, boot or cast
Contact us for a review if
- your ankle keeps giving way, or you sprain it again
- you still have significant pain or swelling that is not improving after about 6 weeks, or deep pain in the joint with catching or locking. This needs a review and possibly an MRI scan to check the joint surface.[2]
- the pain is mainly higher up, above the ankle, or worse when the foot is twisted outwards, or you cannot hop. These can be signs of a syndesmosis ("high ankle") injury.[22]
- you have a significant injury on the inside of the ankle (deltoid), or injuries on both sides
- you are not progressing through the phases as expected
Frequently Asked Questions
References
- Martin RL, Davenport TE, Fraser JJ, et al. Ankle stability and movement coordination impairments: lateral ankle ligament sprains revision 2021. J Orthop Sports Phys Ther. 2021;51(4):CPG1–CPG80. doi:10.2519/jospt.2021.0302
- Vuurberg G, Hoorntje A, Wink LM, et al. Diagnosis, treatment and prevention of ankle sprains: update of an evidence-based clinical guideline. Br J Sports Med. 2018;52(15):956. doi:10.1136/bjsports-2017-098106
- Delahunt E, Bleakley CM, Bossard DS, et al. Clinical assessment of acute lateral ankle sprain injuries (ROAST): 2019 consensus statement and recommendations of the International Ankle Consortium. Br J Sports Med. 2018;52(20):1304–1310. doi:10.1136/bjsports-2017-098885
- Smith MD, Vicenzino B, Bahr R, et al. Return to sport decisions after an acute lateral ankle sprain injury: introducing the PAASS framework – an international multidisciplinary consensus. Br J Sports Med. 2021;55(22):1270–1276. doi:10.1136/bjsports-2021-104087
- Lamb SE, Marsh JL, Hutton JL, et al. Mechanical supports for acute, severe ankle sprain: a pragmatic, multicentre, randomised controlled trial. Lancet. 2009;373(9663):575–581. doi:10.1016/S0140-6736(09)60206-3
- Bleakley CM, O'Connor SR, Tully MA, et al. Effect of accelerated rehabilitation on function after ankle sprain: randomised controlled trial. BMJ. 2010;340:c1964. doi:10.1136/bmj.c1964
- Hupperets MD, Verhagen EA, van Mechelen W. Effect of unsupervised home based proprioceptive training on recurrences of ankle sprain: randomised controlled trial. BMJ. 2009;339:b2684. doi:10.1136/bmj.b2684
- Doherty C, Bleakley C, Delahunt E, Holden S. Treatment and prevention of acute and recurrent ankle sprain: an overview of systematic reviews with meta-analysis. Br J Sports Med. 2017;51(2):113–125. doi:10.1136/bjsports-2016-096178
- Koris J, Calder JDF, Dalmau-Pastor M, Fernandez MA, Ramasamy A. Deltoid ligament injuries: a review of the anatomy, diagnosis and treatments. Knee Surg Sports Traumatol Arthrosc. 2024;32(12):3052–3064. doi:10.1002/ksa.12274
- Stiell IG, Greenberg GH, McKnight RD, et al. Decision rules for the use of radiography in acute ankle injuries: refinement and prospective validation. JAMA. 1993;269(9):1127–1132. doi:10.1001/jama.269.9.1127
- Bachmann LM, Kolb E, Koller MT, Steurer J, ter Riet G. Accuracy of Ottawa ankle rules to exclude fractures of the ankle and mid-foot: systematic review. BMJ. 2003;326(7386):417. doi:10.1136/bmj.326.7386.417
- Dubois B, Esculier JF. Soft-tissue injuries simply need PEACE and LOVE. Br J Sports Med. 2020;54(2):72–73. doi:10.1136/bjsports-2019-101253
- Bleakley CM, Glasgow P, MacAuley DC. PRICE needs updating, should we call the POLICE? Br J Sports Med. 2012;46(4):220–221. doi:10.1136/bjsports-2011-090297
- Janssen KW, van Mechelen W, Verhagen EA. Bracing superior to neuromuscular training for the prevention of self-reported recurrent ankle sprains: a three-arm randomised controlled trial. Br J Sports Med. 2014;48(16):1235–1239. doi:10.1136/bjsports-2013-092947
- Megalaa T, Beckenkamp PR, Fong Yan A, Hiller CE. What are the clinical recommendations for the use of ankle braces? A scoping review. JSAMS Plus. 2024;3:100058. doi:10.1016/j.jsampl.2024.100058
- Plisky PJ, Rauh MJ, Kaminski TW, Underwood FB. Star Excursion Balance Test as a predictor of lower extremity injury in high school basketball players. J Orthop Sports Phys Ther. 2006;36(12):911–919. doi:10.2519/jospt.2006.2244
- Lunsford BR, Perry J. The standing heel-rise test for ankle plantar flexion: criterion for normal. Phys Ther. 1995;75(8):694–698. doi:10.1093/ptj/75.8.694
- Hébert-Losier K, Wessman C, Alricsson M, Svantesson U. Updated reliability and normative values for the standing heel-rise test in healthy adults. Physiotherapy. 2017;103(4):446–452. doi:10.1016/j.physio.2017.03.002
- Tassignon B, Verschueren J, Delahunt E, et al. Criteria-based return to sport decision-making following lateral ankle sprain injury: a systematic review and narrative synthesis. Sports Med. 2019;49(4):601–619. doi:10.1007/s40279-019-01071-3
- Petersen W, Rembitzki IV, Koppenburg AG, et al. Treatment of acute ankle ligament injuries: a systematic review. Arch Orthop Trauma Surg. 2013;133(8):1129–1141. doi:10.1007/s00402-013-1742-5
- van Rijn RM, van Os AG, Bernsen RM, et al. What is the clinical course of acute ankle sprains? A systematic literature review. Am J Med. 2008;121(4):324–331.e6. doi:10.1016/j.amjmed.2007.11.018
- Sman AD, Hiller CE, Rae K, et al. Diagnostic accuracy of clinical tests for ankle syndesmosis injury. Br J Sports Med. 2015;49(5):323–329. doi:10.1136/bjsports-2013-092787
- Wagemans J, Bleakley C, Taeymans J, et al. Exercise-based rehabilitation reduces reinjury following acute lateral ankle sprain: a systematic review update with meta-analysis. PLoS One. 2022;17(2):e0262023. doi:10.1371/journal.pone.0262023
- Jeske HC, Hirnsperger C, Perwanger F, et al. Break reaction time after conservatively treated ligament ruptures of the ankle. Injury. 2021;52(8):2463–2468. doi:10.1016/j.injury.2021.02.061
- Kemler E, van de Port I, Schmikli S, Huisstede B, Hoes A, Backx F. Effects of soft bracing or taping on a lateral ankle sprain: a non-randomised controlled trial evaluating recurrence rates and residual symptoms at one year. J Foot Ankle Res. 2015;8:13. doi:10.1186/s13047-015-0069-6
Kit I recommendالعدّة التي أوصي بها
Items patients often find useful during rehab. These are general suggestions, not medical advice; follow the advice of Mr Hester or your physiotherapist.
- A60 ankle brace — Semi-rigid brace that fits inside a sports shoe, for sport after a sprain
- McDavid lace-up ankle brace — Lace-up brace with figure-of-eight straps; wear it inside your trainer
- THERABAND resistance bands — For the band exercises in Phase 2 (start with a lighter band)
- Foam balance pad — For single-leg balance work on a soft surface in Phase 3
- Agility ladder — For the ladder drills in Phase 4
- Ankle ice pack — Cold therapy to help settle swelling in the first days
- Crutches — For the first few days if walking is very painful
See all recommended equipment on Equipment & Devices.
To discuss your symptoms with Mr Hester, please get in touch to arrange a consultation. Appointments are available privately in central London and in the NHS at King's College Hospital.
Book a ConsultationCall 020 7046 8004. Private clinics at Devonshire Place, Cromwell Road, London Bridge and King Edward VII's Hospital.
This page provides general information and is not a substitute for personal medical advice. If you have diabetes, reduced sensation or circulation problems in your feet, or sudden severe pain, swelling or redness, please seek medical advice promptly.